
The PLA Battalion Template
#88 PLA Army Battalion in the Offense - Mobile Assault (機動突擊)

The above tactical illustration, its component parts below, and our analysis therein is intended to serve as the basis for a PLA Army combined arms battalion template that can furnish a foundational starting point for American and Allied ground, air, and special operations forces to train against.
For Mandarin-enabled followers, please first review these two CCTV videos on the PLA here and here. Also please read LtCol Lu Bingyang’s article on combined arms battalion tactics here. Other pertinent sources are listed at the end of this article.
This body of knowledge, combined with Vermilion’s understanding of the PLA serves as the foundation for this document. We discuss the tactical principles and lessons learned from this body of knowledge below. We then walk the dog on a PLA Army Battalion in the Offense - Mobile Assault (機動突擊).
Tactical Principles & Lessons Learned
1) Casualty Acceptant for a Purpose: Red is realistic about suffering combat losses and these losses are not necessarily seen as failure. 50%+ attrition is acceptable if it provides red with positional advantage on the battlefield.
There are multiple points in exercise videos where PLA officers discuss what would be considered massive attrition in the eyes of blue officers. Yet the PLA officers shrug off or even laugh off the casualties with the insistence that these tactics are buying their operations the windows of opportunity required to hit blue forces from unexpected angles. This is in fact what occurred in this video (though the red force was eventually destroyed).
The standard tactical approach at echelon from squad to battalion appears to focus on splitting a unit's forces in two. There is a “fix and distract” element (sometimes referred to as a “sacrifice”) that is intended to absorb casualties and soak up blue’s capacity to respond. Then there is an element that is meant to accomplish the objective.
This standard tactic is known by the idiom “make a noise in the east to attack the west” (聲東攻西).
Lesson Learned: Attrition is not enough to stop the PLA. Even if the initial engagement is heavily in blue’s favor, the blue commander should be extremely wary that the red commander’s main effort attack is only beginning to unfold from an unexpected direction.
The PLA is training to operate at a level of casualties that blue commanders are likely not contemplating for their own forces.
2) Exchange Ratios: There is an understanding amongst red officers that the PLA has a high chance of losing direct engagements if forces are similarly sized. To stress this point, the PLA issues OPFOR (opposition force) units the best equipment available.
In one training exercise, the exchange ratio was 1 OPFOR tank and a few OPFOR anti-tank teams for 11 PLA infantry fighting vehicles (IFVs) and 7 PLA tanks (roughly a company). Red officers believe these ratios are manageable as long as they lead to a stronger red overall position which allows the red commander to launch a successful surprise attack.
Such tactics require that the PLA bring mass to the battlefield. Red trains on a rough minimum 3:1 favorable force ratio (battalion vs company, brigade vs battalion, etc). This extends to recon units as red must “out recon” blue to dominate in the information domain.
Lesson Learned: If blue ground commanders are training on 1:1 or 2:1 force ratios, they must urgently adjust. It seems unlikely that red commanders would even countenance engaging blue ground forces at a 1:1 ratio in the offense or defense. It also seems unlikely that red commanders would choose to fight at a 2:1 force ratio unless there were no other options.
This should also give blue commanders confidence when ISR identifies that blue has anything greater than 33% of red’s strength.
3) Recon, Recon, Recon: Red relies heavily on recon (ZC/偵察) troops to adjust their own positioning (部署) and scheme of maneuver. This is a component of information warfare: red must locate and identify the blue “bushu” (部署) or disposition while protecting their own.
PLA recon troops penetrate deep into enemy territory and use equipment like drones and advanced spectrum reconnaissance systems to locate and identify enemy units. Once key units are located (artillery, HQ, air defense, etc), recon can use fires to strike these targets.
Remaining blue forces’ disposition (部署) is transmitted to the red commander in order for him to decide how and where to attack. Once the main attack begins, recon units withdraw from the battlefield or push deeper into blue’s area of operations.
Every level of red commander relies on a certain kind of recon (ZC/偵察) troop. Group army has a SOF brigade, brigade has a recon battalion, and battalion has a recon company.
Lesson Learned: Blue forces should expend significant energy destroying red recon troops. It is unlikely that red forces are cross-trained in recon specific tasks, meaning that casualties to red recon have an outsize impact.
Destroying red recon units denies red commander the ability to plan. This also allows the blue commander to engage the larger red force in detail and on his own terms without suffering from the “make a noise in the east to attack the west” (聲東攻西) standard tactic.
4) Planning: Red places a heavy emphasis on planning, op orders, sand tables, and command briefings. The “Chouhua” operational-level planning (CN) meeting is held at the brigade level between the “military decision-making trio.” This trinity consists of the brigade commander, brigade political commissar, and chief of staff. These individuals form the nucleus of the basic command post (基本所) that serves as the primary ground force HQ and takes direction from the Group Army.

In the past, political officers were “yes men” (CN) for their commanders and tended to withdraw during exercises to discuss theory with other political officers. Times have changed. As evidenced in exercise videos, news articles, and open-source PLA after action reports, political officers play a key role in the new trinity of tactical leadership combat decision making.
This provides red units with a deep bench of officers and a stable succession of command, both requirements in a high casualty environment.
Lesson Learned: Blue commanders need to be cognizant that destroying red ground C2 is not a single strike mission, but is instead like mowing the grass. Blue tactical ISR needs to aggressively search for and locate the multiple, redundant, and regenerating C2 nodes red forces rely on (CN).
5) Red Believes Blue Over-Focuses on Key Terrain: Red commanders reference blue commander’s willingness to fight to the death for key terrain. In addition, there is a perception that blue will focus recon assets on key terrain with the intent to seize and occupy. Therefore, red officers tend to anchor their plans for destruction battles around blue’s occupation of key terrain.

Lesson Learned: Red commanders seem to be overstating blue’s focus on key terrain. It seems likely that blue commanders can gain the element of surprise by executing unexpected movements across marginal terrain that red forces are conditioned to pay less attention to.
PLA Army Battalion Template
The information below is intended for a professional military audience. We translated PLA military jargon and operational graphics to the best of our ability. If you have any questions, please feel free to reach out to us.
The below graphics (Illustrations 1, 2, and 3) may look similar to blue ops graphics overlays, but are quite different. They are packed with information and function almost like explicit orders (what blue forces would call a written op order). This technique is logical for a less literate force.
Each line, unit position, arrow, etc is tied to specific tangible objective data. Command groups dictate to subordinates at what time, in what formation, and at which location they should conduct actions.
Our PLA Army Battalion Template describes a mobile assault (機動突擊) in three tactical illustrations created by LtCol Lu Bingyang, Taiwan Army. These illustrations are based on LtCol Lu’s wide ranging study of the PLA and PLA operational texts, but they are NOT published by the PLA.

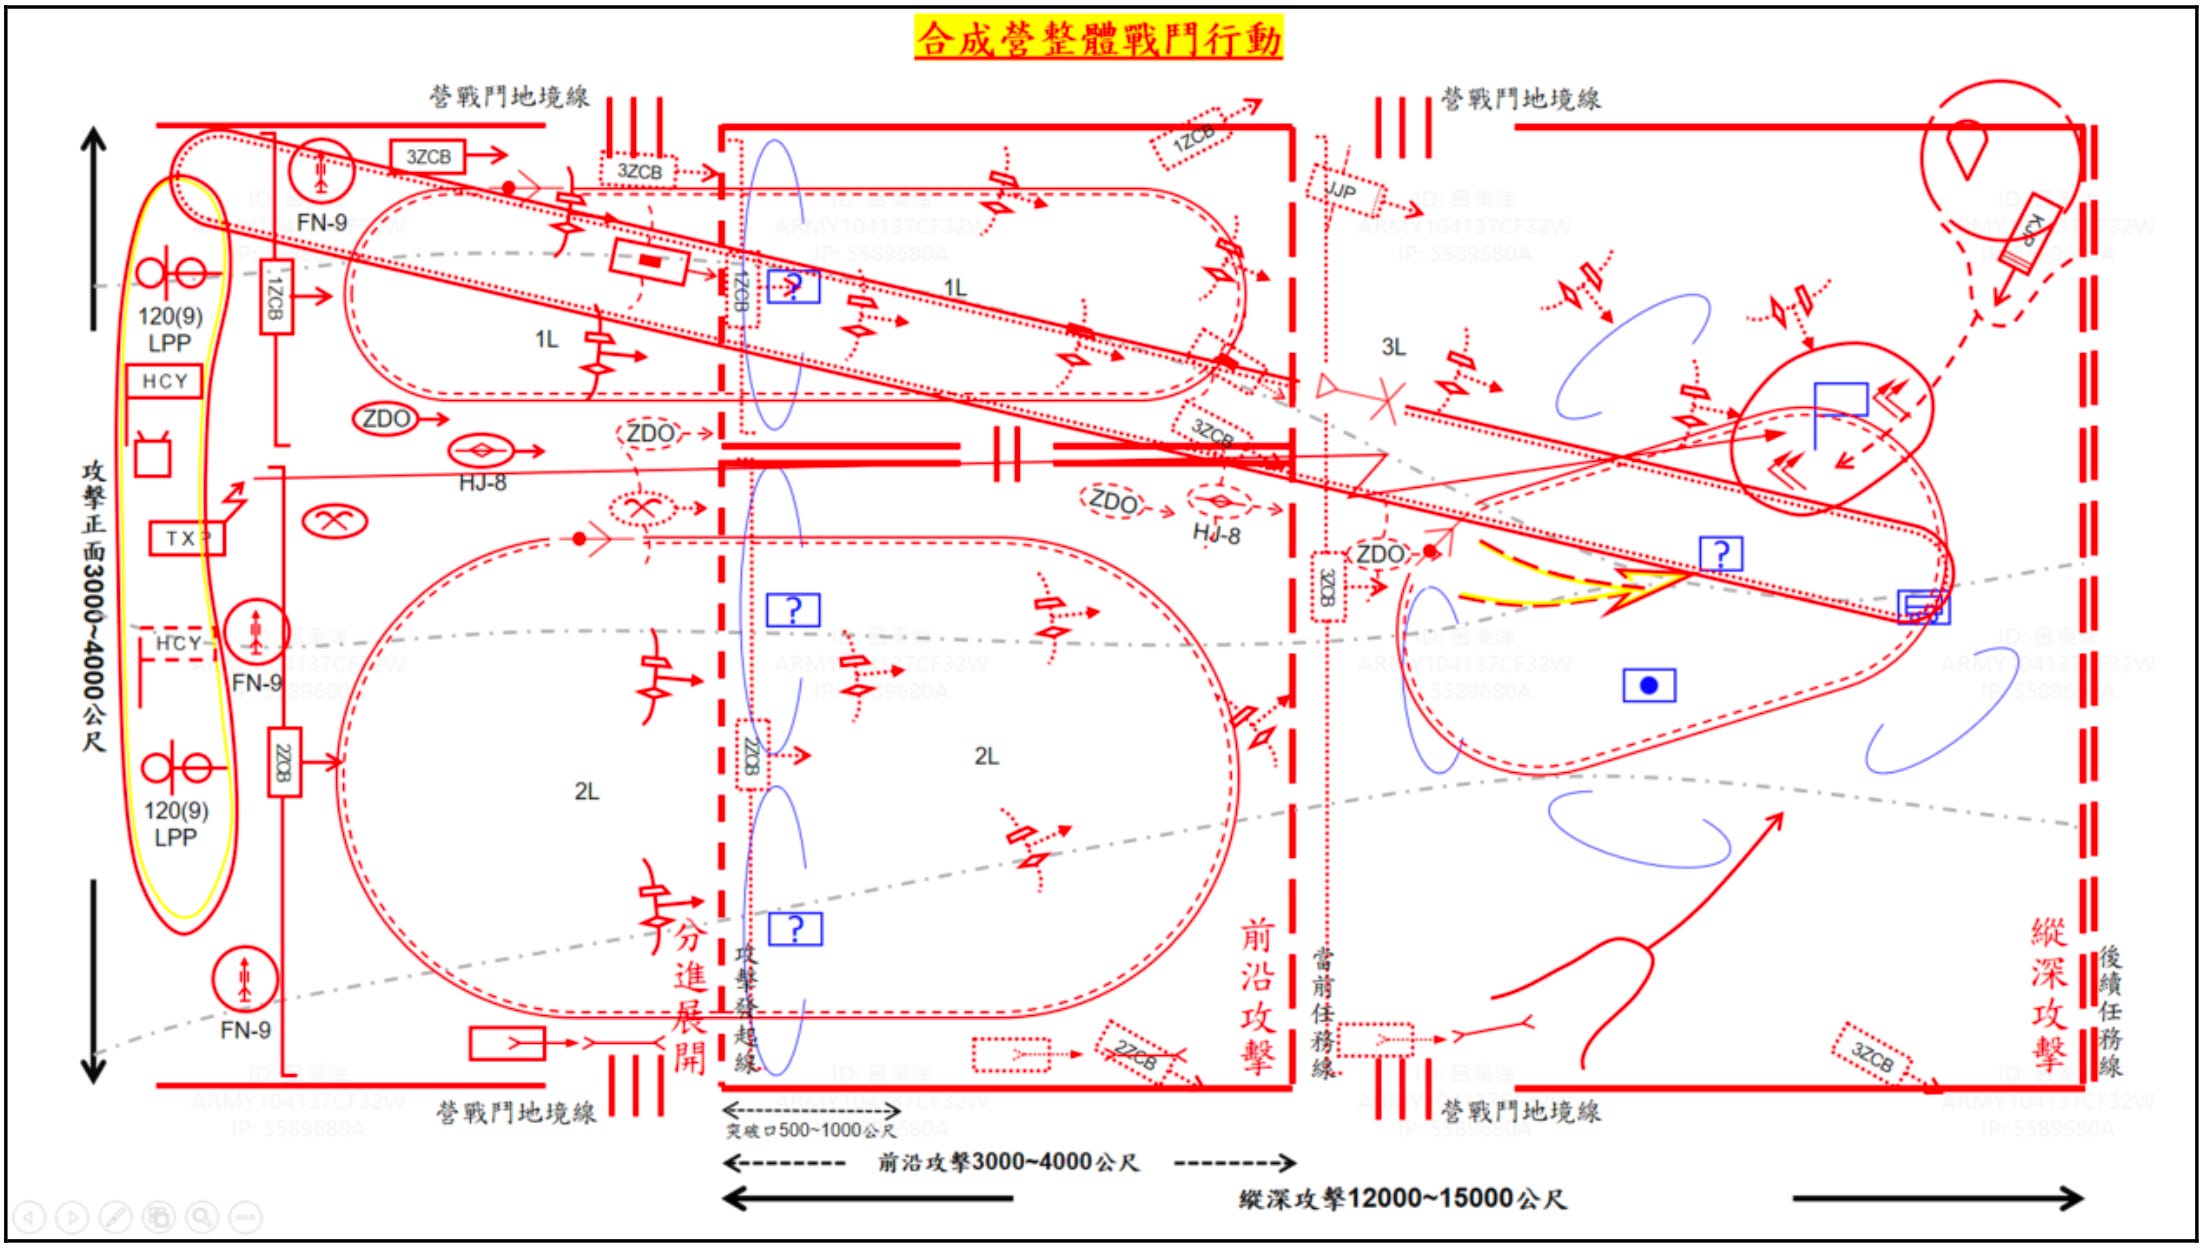
Let’s discuss this Illustration 1 graphic from the outside in. We see a large red rectangle bounding the entire area of the graphic, interspersed with the “III” marking. This III is the battalion combat area boundary line (營戰鬥地境線) which demarcates this battalion’s area of operations (AO) against adjacent battalions’ AOs which are not depicted.
Throughout the AO we can see faint gray dashed-dotted lines indicating avenues of approach, likely representing roads.
We can see the entire Illustration 1 graphic is roughly divided into thirds. Let’s begin reading the battalion’s AO control measures and units from the left to the right.
On the extreme left, we can see in black text the attack frontage 3000-4000 meters (攻擊正面 3000-4000 公尺). For this situation, a red battalion’s attack frontage will be 3-4 kilometers.
On the extreme bottom, we can see some reference measures in black important to the coming red battalion attack. From top to bottom, there is a breach zone of 500-1000 meters (突破口500-1000公尺), a forward attack of 3000-4000 meters (前沿攻擊3000-4000公尺), and a depth attack of 12,000 to 15,000 meters (縱深攻擊12000-15000公尺).
Back to the left-most side, next to the “attack frontage 3000-4000 meters” (攻擊正面 3000-4000 公尺) black text, there are two red units. The left-most unit is a red box with two antennae, an intelligence warfare element (情報站). The mission of this unit is to manage the collect from reconnaissance elements and feed it to battalion decision-makers, allowing the battalion to adjust its deployment (部署). Note that this is NOT an information warfare element which would likely be led by a political officer with the mission to collect battlefield data and turn it into propaganda to be used to support red and attack blue.
Close by is a unit labeled TXP, meaning communications platoon (通信排). It is a red box with a “radar wave” style crooked arrow pointing to the upper right. The unit is labeled electronic warfare platoon (電戰排).
More difficult to notice is the TXP is in the attack; there is a long thin red line (also in the radar wave crooked arrow style) pointing all the way to the blue headquarters unit (denoted as a blue flag) on the right-most third of Illustration 1. This thin red crooked line is labelled electronic confrontation direction (電子對抗方向).
A red circle is drawn around the blue headquarters flag, denoting the target area of red electronic activity. There are two sets of paired bent red arrows surrounding the blue HQ, suggesting that red EW assets are turned on and in effect. This piece of the graphic is then labelled “passive interference area” (無源干擾區). This suggests the red EW assets are not actively jamming and emitting a signal, but rather surveying the electronic environment to identify and locate the blue HQ’s unique radio signals.
Proceeding just to the right of the communication platoon’s (TXP’s) location, we see control measures dividing the red battalion’s AO. The top red line is designated battlefield observation team 1 (戰場觀察1組) and the bottom red line is designated battlefield observation team 2 (戰場觀察2組). These teams are constructed of recon companies and unmanned aerial systems.
Within battlefield observation team 1 (戰場觀察1組), we can see on the left side a unit labelled 1ZCB with long dog legs extending to the top and bottom, a unit labelled 3ZCB without dog legs, and a large oval-shaped aviation track.
1ZCB is first reconnaissance and surveillance (R&S) squad (1偵察班). The dog legs extending from 1ZCB indicate that the unit is instructed to maintain a roving (游動) movement pattern through this area at this dog leg’s specified width.
1ZCB has a short right pointing arrow depicting the direction of action (If this short line was arrowless, it would indicate the orientation of a defense) with the annotation “reconnaissance and surveillance search” (偵察搜索). The dog legs denote the starting line for 1ZCB’s search.
In this order of battle, the red battalion has a reconnaissance and surveillance (R&S) company broken into at least three R&S squads.
During the “reconnaissance and surveillance search” (偵察搜索), these R&S squads will be searching for blue C2, fires, and communications hubs in order to locate them and call in fires.
3ZCB is third R&S squad (3偵察班). It is not depicted with a search area, but instead moving to the north and forward of 1ZCB (it is not yet conducting its main mission).
There is a very large oval-shaped track designated as a drone (無人機). The track includes the ops graphic for a light drone, a red line with bisecting oblique lines (swept wings indicating a fixed wing asset) and a single solid red dot (denoting ISR capability). The oval-shaped track consists of an outer solid line and an inner dotted line, indicating that the system will not simply do a single loop and return, but instead conduct continuous loops in order to provide ISR coverage.
We can see that 1ZCB and 3ZCB are duplicated to the right but in dotted line form. This shows the time-phased movement of those units. Normally, a finished red ops graphic would include the time date group next to each instantiation of 1ZCB to show its progress across time during the operation. In this graphic, time date groups are omitted for simplicity.
As 1ZCB and 3ZCB move to the right (covered by the drone), we see them cross a thick red vertical dashed line and enter a small red box. The thick red vertical dotted line is an operational demarcation line (作戰分界線). The first single dash operational demarcation line in this graphic shows us the red battalion’s “attack initiation line” (攻擊發起線) and the second operational demarcation line shows us the red battalion’s “current mission line” (當前任務線). When the maneuver companies finally show up, they will move to the attack initiation line (攻擊發起線), which we will discuss in Illustration 3.
If we sneak a look to the right-most part of Illustration 1, we see a doubled thick red vertical dashed line, which is another type of operational demarcation line (作戰分界線) known as a subsequent mission line (後續任務線). This lets us know where the battalion's subsequent or follow-on mission is to begin, which will not be covered in this article.
The left-most single thick red vertical dotted line or attack initiation line (攻擊發起線) is aligned against a blue defensive position depicted as three blue ovals with open backs (identical to blue ops graphics), and the blue units themselves depicted as blue rectangles (identical to blue ops graphics) with blue question marks. Red is unsure what type of blue units these are.
The fact that the first thick red vertical dotted line / attack initiation line (攻擊發起線) is anchored against blue’s forward line of own troops (FLOT) suggests that this control measure is similar to a blue ops graphic’s line of departure (LD) or line of contact (LC).
The red box that 1ZCB and 3ZCB enter is interspersed with the “II” marking. This II denotes the smaller company areas of responsibility within the red battalion’s AO. This company area does not reference the ZCBs, but instead the maneuver companies that will own these smaller boxes and come later as the battalion attacks to the right. 1ZCB and 3ZCB are the two squads conducting R&S for the maneuver company that will attack within this specific box later in the operation.
As we move to the right and follow the progress of 1ZCB, we can see that this R&S squad finishes its primary mission at the end of the small red company box. We see a third dotted 1ZCB box which directs 1ZCB to leave the battalion’s AO exiting to the upper right. Presumably, 1ZCB would inform the adjacent battalion above that the squad is leaving their own battalion’s AO and entering a new battalion’s AO in order to continue recon deeper into enemy lines. 1ZCB’s mission has set conditions for 3ZCB to begin their primary mission, but let's set this aside for now and rewind to see what 2ZCB is doing.
Looking below 1ZCB’s area, we can see 2ZCB (second reconnaissance and surveillance squad / 2偵察班) with its own dog legs within battlefield observation team 2 (戰場觀察2組) also with its own drone (無人機) tracks. 2ZCB's scheme of maneuver is very similar to 1ZCB, except for the fact that 2ZCB is responsible for reconnoitering two blue defensive positions. 2ZCB then exits the battalion AO to the bottom of the graphic, similar to 1ZCB’s departure at the top of the graphic.
With 1ZCB and 2ZCB complete, the stage is now set for 3ZCB (3偵察班). 3ZCB has its own second thick red vertical dotted line / the “current mission line” (當前任務線) anchored against blue’s main force disposition and dividing Illustration 1 into its right-most third. This second thick red vertical dotted line/current mission line (當前任務線) denotes another final line of departure (LD) or line of contact (LC).
Blue’s main force consists of a blue headquarters (the blue flag), a blue artillery unit (blue rectangle with centered blue dot), a blue wheeled logistics units (blue rectangle with a wheeled box), another blue mystery unit (blue rectangle with a question mark), and four blue defensive positions (blue ovals with open backs).
3ZCB also has its own battlefield observation team 3 (戰場觀察3組), consisting of 3ZCB, a sniper platoon (JJP / 狙擊排), and the supporting drone track. This drone (無人機) track is less circuitous and is concentrated on top of blue’s main force disposition. At this point in the operation, red forces’ use of drone saturation is an attempt to lure out blue air defense assets for identification and targeting.
The JJP sniper platoon (狙擊排) is setting up at the top of the graphic in the right-most third, oriented towards the blue headquarters. The front 1/5th of the JJP rectangle contains a single line, indicating that this unit’s mission is surprise attack (襲擊). The sniper platoon will be looking for opportunities to employ precision fires as well as locate targets for deep fires.
3ZCB’s dotted dog legs cover the entire battalion attack frontage (攻擊正面) and 3ZCB is expected to reconnoiter through the blue main force disposition and exit the red battalion AO to the bottom right of the graphic.
Remember that 1ZCB, 2ZCB, and 3ZCB are transmitting their information back to the intelligence warfare element (情報站) on the left-most side of Illustration 1. This element is making sense of blue’s deployment (部署) in order to inform the red battalion.
At the right-most edge of the graphic, we can see the battalion combat area boundary line (營戰鬥地境線) terminating in a doubled thick red vertical dashed line. Remember this is an operational demarcation line (作戰分界線) which tells us where the next mission begins (the subsequent mission line/後續任務線). Blue forces might call this the limit of advance (LOA). In blue ops graphics, this line is usually represented as a thick black line labeled LOA.
Let us now evaluate the Illustration 1 red scheme of maneuver in light of exercise videos and the red tactics article written by LtCol Lu, Taiwan Army.
1) Red’s recon elements are able to move throughout the entire width and depth of the blue formation without running into resistance. If blue forces are equipped with counter-recon assets like scouts, drones, or dogs, they could detect and potentially neutralize red recon.
During one of the exercise videos, red recon is surrounded deep in blue territory, forcing the unit to sacrifice a team in order for the rest of the formation to escape.
2) While Illustration 1 depicts multiple drone tracks, the total number of drones isn’t clear. If drones are downed by blue air defense or EW, red recon loses a primary method of scouting, significantly degrading the battalion scheme of maneuver. Red would need to ensure sufficient mass and redundancy in drone deployment to compensate for losses.
3) If the intelligence warfare element (情報站) or TXP (通信排) supporting the red battalion are compromised by blue EW, cyberattacks, or kinetic strikes, the battalion’s situational awareness and ability to hide its own bushu (部署) would be impeded.
Additionally, the intelligence warfare unit likely relies on uninterrupted communication with red recon, drones, and battalion leadership. Blue’s EW assets could disrupt these links, degrading red’s ability to coordinate operations.
Illustration 1 Glossary
營戰鬥地境線 = Battalion Combat Area Boundary Line
攻擊正面 = Attack Frontage
突破口 = Breach Zone
前沿攻擊 = Forward Attack (Zone)
縱深攻擊 = Depth Attack (Zone)
情報站 = Intelligence Warfare Element
電戰排 = EW Platoon, “TXP”, 通信排
電子對抗方向 = Electronic Confrontation Direction
無源干擾區 = Passive Interference Area
战场视察X组 = Battlefield Observation Team
偵察班 = Reconnaissance Squad, “ZCB”
偵察搜索 = Reconnaissance and Surveillance Search
無人機 = Drone
狙擊排 = Sniper Platoon, “JJP”
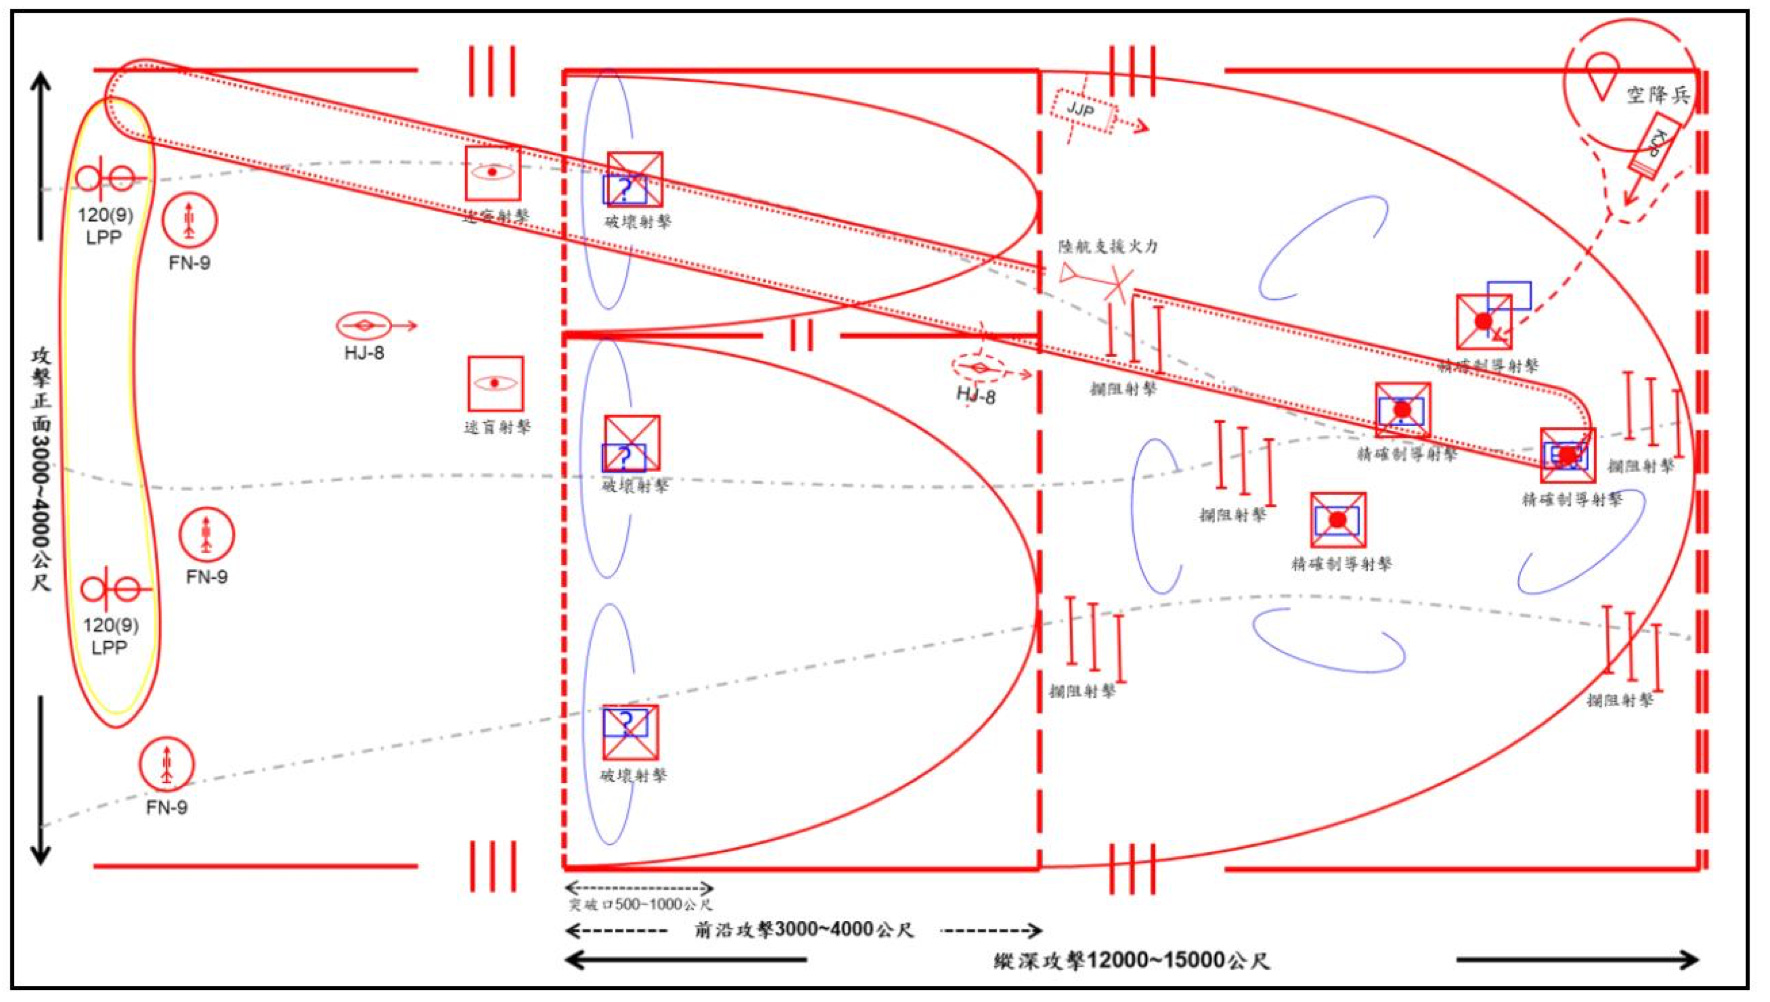
This Illustration 2 graphic retains the familiar control measures of Illustration 1, but adds additional units and actions as the red battalion proceeds into the next portion of the operation: information-fires strike and surprise destruction combat operations. It is important to note that the Illustration 1 units and actions are still happening in Illustration 2, they have simply been removed for clarity’s sake. For example, in Illustration 2, the red drones from Illustration 1 are still flying, but they are not depicted. We will include a final Illustration with much of the information on one overlay at the end.
Beginning with the left-most third of Illustration 2, we can see a red oval with highlighter yellow inside shading denoting a firing position. We will discuss the shading later. Within the firing position are two units, each an LPP (榴彈炮排) or mortar-howitzer platoon. The circle at the base of the red “T” indicates a self-propelled mortar, while the circle bisected by the “T” indicates a howitzer. Therefore, this system is most likely the PLL-05. Each LPP has a “120” denoting the firing units are 120mm and a (9), denoting each platoon as 9 firing assets.
Just forward of the LPPs are three circular firing positions each containing an “FN-9.” In Soviet/Russian/PRC ops graphics, single upwards pointing arrows indicate air defense. In this case, these are air defense teams armed with something called the “FN-9.” This is likely a mistake in nomenclature, which we will discuss below in the evaluation of Illustration 2.
Regardless, the circular shape (as opposed to a triangle or square) of these air defense assets tells us they are relatively small elements. It is typical for red forces to protect artillery firing positions and headquarters with air defense systems, since red typically sees their artillery fires and C2 as “centers of gravity.”
Just forward of the likely MANPADS teams, we can see a single HJ-8 (紅箭-8) team. This is an optically tracked, wire guided anti-tank guided missile (ATGM) system similar to the American BGM-71 TOW.
The line through the diamond symbol represents an anti-tank capability. The fact that this symbol is an oval/ellipse lets us know it is part of the commander’s operational reserve (預備隊), specifically an anti-tank reserve (反坦克預備隊). This formation is under the direct command of the battalion commander and likely serves as a blocking force if the battalion suffers from a blue armored penetration.
Immediately to the front of the HJ-8, we see two red boxes each containing what looks like an eye (the eye looks like the blue ops graphic for self-propelled artillery, but this is not the case).
These red boxes indicate blinding fires attacks (迷盲射擊). Blinding fires are part of the information-fires strike operational approach and are meant to 1) cover advancing red units, 2) blind targeted blue units, and 3) confuse the blue commander as to red’s intentions.
Here, blinding fires attacks are executed against the blue forward line in order to cover the advancing HJ-8 and maneuver companies.
Proceeding to the right, we see three red boxes each containing an X placed on top of the blue positions. Again, this is not a red unit, but the ops graphic for destruction fires missions (破壞射擊) conducted across blue’s frontage.
Across the entire upper half of Illustration 2, we also see a long thin oval representing another aviation track. It includes a depiction of the platform, a triangle with a single line emanating from the triangle’s point ending in a large X. This X indicates a rotary wing platform while the triangle denotes attack aviation.
The platform is labeled “army aviation supporting firepower” (陸航支援火力).
The track consists of a solid outer red line and a dotted inner red line, again indicating that this asset is available for multiple attack runs, or will at least be burning holes in the sky for some time. This rotary attack unit is contributing to the firepower strikes across blue’s frontage and depth.
On the right-most third of the Illustration, we can see multiple sets of three vertical lines. Each set of vertical lines is labelled blocking fires attack (攔阻射擊). These are placed on avenues of approach (the faint gray dashed-dotted lines likely represent roads) surrounding the blue main force disposition, intended to isolate the blue force and prevent reinforcement of blue’s FLOT or retrograde.
The fact that every blocking fires attack consists of three lines is significant, indicating that the red commander wants each blocking fires attack (攔阻射擊) to consist of three preplanned lines of blocking fires.
Technically, this makes them all multi-path blocking fires attacks (多道攔阻射擊), which are often given brevity codes for each line. For example, a single multi-path blocking fires attack point could consist of eagle 1, eagle 2, and eagle 3 (鷹1/鷹2/鷹3), each denoting a separate vertical line of fires.
Note that red forces make heavy use of unobserved fires. Ideally, the ZCB R&S squads or JJP sniper platoon would help guide these fires, but this is not necessary.
Moving to the blue main force disposition, we can see that the blue units are covered by more red boxes, but this time with red boxes containing an X along with a centered red dot. Again, these are a type of fires mission. The boxes are labeled precision guided fires attack (精確制射擊).
While the volume of dumb munitions are employed in blinding fires, blocking fires, and conventional fires against secondary units, precision guided munitions (PGMs) are saved for the principle blue targets.
Finally, the upper right area of Illustration 2 contains an airborne drop zone. The circular area denotes the zone and the parachute icon indicates airborne vs air assault. The drop zone is labeled “paratroopers” (空降兵).
The unit is labelled KJP, most likely an airborne platoon (空降排). The two lines on the front 1/5th of the skinny rectangle denote that this unit’s mission is what blue forces would call “search and destroy” (偵察破擊).
This KJP is almost certainly not from the PLA Air Force Airborne Corps (PLAAFAC). If it was, this unit ops graphic would include an inside border indicating a joint unit/effort.
The PLA Army (PLAA) Group Army special operations forces brigades conduct extensive airborne training. The R&S companies resident in the battalions also likely execute some airborne training. While this is a small formation (a platoon), the PLA contains many small fixed wing transport aircraft suitable for small drops. This Army KJP could also have been dropped from helicopters.
Let us now evaluate the Illustration 2 red scheme of maneuver in light of exercise videos and the red tactics article written by LtCol Lu, Taiwan Army.
There seems to be a red assumption that because blue force is on the defense, blue does not move around. This would be highly inaccurate, and it does seem that the red forces in the exercise videos are dealing with a blue that maneuvers in the defense.
Building on this theme, is the expectation that blue HQ stays static reasonable? Here, red forces seem to make the assumption that locating and targeting the blue HQ is achievable. Blue forces could employ multiple decoy HQs and counter-recon, limiting red’s ability to identify blue’s disposition. This would affect the effectiveness of red's fires, especially precision-guided munitions (PGMs).
Red fires units are laying down heavy and constant suppression, but little thought seems to have been invested in thinking about counter-battery or fires mix.
The air picture is generally unrealistic, but executable with high risk. Consider the overlay for rotary attack aviation. Note there are no ingress, holding area, release point, battle position, offset, or egress designations in this ops graphic (as would be typical in a blue ops graphic).
The aviation track itself is executed in the most basic racetrack style, and we have seen no examples of figure 8 or wheel orbits. This track is also smack dab in the middle of a massive artillery fires mission, including the blocking fires and precision strikes.
This suggests that red forces believe in the “small bullet big sky” theory, and that red rotary aviation may operate in battlespace simultaneously under red firepower strike. This could lead to serious red fratricide.
Additionally, red attack aviation is depicted as overflying the red “FN-9” positions which must be deconflicted.
Finally, it seems as if red forces are very confident that blue will have no significant air defense systems. The KJP airborne platoon is dropped deep into blue territory, carried by red air platforms. The rotary attack and drone recon systems continue their mission unperturbed.
NOTE: About those “FN-9” systems: While the PLA fields gun-missile air defense vehicles, unfortunately, none of them are named the FN-9. This is likely an error on the part of the author (LtCol Lu, Taiwan Army) or the underlying red ops graphics.
What the authors probably intended to represent are either FN-6 man-portable air defense system (MANPADS, 飛弩-6 / Flying Crossbow 6) or “Yitian” Short-range air defense system (CN, 倚天防空飛彈武器系統), equipped with 8 TY-90 missiles.
Illustration 2 Glossary
榴彈炮排 = Mortar-Howitzer Platoon, “LPP”
紅箭-8 = HJ-8 ATGM
預備隊 = Commander’s Operational Reserve, literally “reserve team”
反坦克預備隊 = Anti-Tank Reserve
迷盲射擊 = Deception Fires, literally “blind fires”, part of the information warfare plan to deceive blue as to red’s intentions.
破壞射擊 = Destruction fires
攔阻射擊 = Blocking fires
多道攔阻射擊 = Multi-path Blocking Fires Attacks
精確制射擊 = Precision Guided Fires
陸航支持火力 = Army Aviation Supporting Firepower (Rotary)
空降排 = Airborne Troops, “KJP”

Illustration 3 continues to build on the previous Illustrations. First, on the left-most side, we see the combined arms battalion (HCY or 合成營) headquarters denoted with a red flag. This is the primary command post containing the battalion commander and battalion political officer (political director). We can see the headquarters replicated below with a dotted line, indicating that the command post will displace during the operation to avoid blue targeting.
For red ops graphics, the red command post flag icon is specifically scaled to the size of the actual map in use. This then serves as the basis for scaling all other symbols on the illustration/overlay/map. Most units subordinate to a specific flag icon are 3/4ths the height of their parent flag and take up about half the area. This method was not followed for our example illustration, but will be present on those red overlays which are the product of detailed planning.
Higher echelon red command post flag icons are 1/5th larger, and lower echelon flag icons are 1/5th smaller. In this way, one can determine the echelonment of a unit by its size relative to other units on a large map. This may sound pedantic, but the PLA is insanely specific and detailed when it comes to drawing ops graphics.
Continuing to the right of the HCY (合成營), we see an oval (or ellipse) with the crossed retorts symbol inside which represents the chemical defense reserve (反化預備隊). Remember that operational reserves are all represented by ovals and are almost always under the direct command of, in this case, the battalion commander.
To our readers, it may seem strange that chemical defense troops are committed to supporting a ground attack on the battlefield. While PLA chemical defense troops are likely trained in what blue forces would recognize as CBRNE (chemical, biological, radiological, nuclear, explosives) defense concepts, it is far more likely that this unit is held under the commander’s tasking to employ their Type 74-2 flamethrowers, FHJ-02 white phosphorus/obscurants launchers, and/or PF-97 thermobaric rocket launchers.
These are powerful chemical weapons which are capable of immediately clearing strong points or areas of stiff resistance.
Just above the chemical defense reserve, we can see another commander’s operational reserve marked ZDO. This is the combat reserve force (戰鬥預備隊), expected to follow in trace of the main attack and commit forces when the commander believes it is necessary to maintain operational momentum.
To the upper right of the ZDO, we finally lay our eyes on the maneuver companies already unfolded (展開) and in attack formation (進攻隊形).
We see a “1L” written to their rear. This means 1st company (連). Looking beneath 1L, we can identify the platoons of “2L,” or 2nd company.
But back to 1st company/1L. 1st company’s two platoons are depicted with odd symbols. We know that the diamond represents main battle tanks (主戰坦克). The box with an angled front (a trapezoid) represents tracked infantry fighting vehicles (IFVs or 步兵戰車/履帶式). These vehicles form the heart of the combined arms battalion’s fighting power. The tanks are likely ZTZ-96 or ZTZ-99 platforms and the IFVs are almost certainly Type 04A.
Each tank-IFV team is represented on-line side by side with an arrow pointing to the right. This means the unit is in attack formation (進攻隊形) with infantry, IFVs, and tanks in a tactical on-line formation.
If instead the vehicle symbols were in a row following each other, this would mean the formation is in column march (行軍縱隊) conducting an approach march (開進) task, the first phase of the PLA Army’s standard 5 phase attack.
The curved lines extending to the top of the IFV and the bottom of the tank are unfolding lines (展開線) meaning the formation has unfolded (展開) across the appropriate attack frontage as demarcated by the length of the curved wings on the overlay. The fact that the wings are convex indicate that the formation’s tactical task is to gain contact (接敵) and assault (衝擊), two of the five phases of a basic attack conducted against the enemy (approach march/開進, gain contact/接敵, assault/衝擊, breakthrough/突破, deep combat/縱深戰鬥).
Both 1L and 2L have their starting location in the left-most third of Illustration 3. This area is helpfully labelled the separated advance unfold (分進展開), meaning the combat units here have already finished their approach march (開進), have unfolded (展開), and are seeking to gain contact (接敵) in order to launch their assault (衝擊).
Back to 1st company/1L. Between the platoons we see a red rectangle enclosing a smaller solid red rectangle. The engineers make their debut with the engineer obstacle removal team (工程破障隊), a type of mobility asset. The red commander is expecting obstacles (though they are not depicted in this illustration) and has added mobility support to 1st company/1L
Looking below 1st company/1L, we see 2nd company/2L in a similar formation to 1L. Both companies are preparing to cross the attack initiation line (攻擊發起線) indicated by the single thick red vertical dotted line.
On the bottom of Illustration 3, another new unit has appeared. The rectangle with a fletched arrow pointing right indicates this is an interposition force (穿插部隊) intended to thrust deep into blue’s disposition (部署), preventing an orderly retrograde with the goal of destroying blue units displaced by the main effort.
The double fletched arrow in front of the interposition force indicates that this unit contains either bridging equipment or has organic repair capabilities.
With the left-most third of Illustration 3 defined, we will proceed past the attack initiation line (攻擊發起線) to discuss the middle third of Illustration 3. This portion of the attack consists of the action starting from the attack initiation line (攻擊發起線) and ending at the current mission line (當前任務線). This middle box is labeled the forward attack zone (前言攻擊), which is the portion of the attack we find ourselves in. Within this box occurs the phase 3 assault (衝擊) of the 5 phase attack.
The battalion commander has ordered 1st company/1L to conduct a pincer attack (鉗擊), indicated by the double arrows. This means that the attacking force is attacking the same target but from different breakthrough points. We can see from the wide base of the arrow (which subsumes the first line of blue troops) that the scheme of maneuver calls for 1st company/1L to assault through the blue forward defense together, only dividing into separate breakthrough points after penetrating blue’s forward line.
The width at the base of the pincer attack (鉗擊) double arrow indicates that this is the intended attack frontal coverage width for 1st company/1L. The centerline of the arrows show the axes (multiple axis) of attack. The arrow tips point accurately to the endpoint of the attack, or what blue forces would call a limit of advance (LOA).
Looking below to 2nd company/2L, we can see their attack denoted by a single dashed line red arrow. This indicates that this attack is a supporting effort to 1st company/1L’s main effort attack.
Once 1st company/1L and 2nd company/2L have achieved their attack objectives, they sit on the second thick red vertical dashed line. Remember that this is an operational demarcation line (作戰分界線) representing the current mission line (當前任務線). With 1st company/1L and 2nd company/2L occupying the current mission line (當前任務線), the red battalion commander is now prepared to launch the attack which will accomplish the objective given to him by his brigade commander.
Let us now discuss the right-most third of Illustration 3. This phase of the attack consists of the action starting from the current mission line (當前任務線) and ending at the subsequent mission line/後續任務線). This box is labeled the deep attack (縱深攻擊), which is the portion of the attack we find ourselves in. This includes both the 4th and 5th phase of the standard PLA attack: breakthrough (突破) and deep combat (縱深戰鬥).
With 1st company/1L and 2nd company/2L making up the red forward line of troops (FLOT), 3rd company/3L is ready to transition into the attack. 3rd company/3L is expected to begin their attack in the upper part of the overlay, along a narrow width of frontage, and drive all the way to the rear of the blue main force disposition (indicated by the end tip of the red arrow). This attack is depicted as a wide arrow, indicating it is the main effort.
Below 3rd company/3L’s main effort attack, we see three supporting attacks which we will discuss from top to bottom.
Right below 3rd company/3L’s maine effort attack, we can see the ZDO combat reserve force (戰鬥預備隊) launching an attack directly against blue’s position anchored on the road intersection. This is likely supporting effort 1.
We can see a secondary color (highlighter yellow) lining the inside of the ZDO’s attack graphic. This secondary color denotes that these actions occur in a linked phase with other graphics also sporting the same secondary color. This suggests the ZDO will make a push into the blue main force disposition while being supported by the 120mm mortar-howitzers, whose firing position is also lined with the secondary color (highlighter yellow - please reference Illustration 2). This likely means that the red battalion commander is holding his organic fires (the 120mm mortar-howitzers) in reserve until the ZDO commences its attack.
Below the ZDO’s attack, we see another supporting attack indicated by the single dash red arrow. This indicates that 2nd company/2L is not yet finished, and must attack along the right flank of the ZDO into the blue artillery position. This is likely supporting effort 2.
Below the 2nd company/2L’s supporting effort 2, we see yet another attack initiated by the interposition force (穿插部隊). Remember that this force is depicted by the red rectangle with a fletched arrow exiting the rectangle and pointing right. This is likely supporting effort 3.
The interposition force’s (穿插部隊) attack is represented by a small red arrowed line, indicating it is of lesser importance. We can also see that the arrow emanates from an open U-shaped graphic. This u-shaped graphic denotes that this formation will not be attacking on-line as the other units, but instead attack in open order (疏開隊形) with plenty of space between elements. These elements are to be dispersed within the boundaries of the open space enclosed by the U-shape.
The mission of the interposition force (穿插部隊) is to attack the southernmost avenue of approach and interpose themselves between blue units. The red commander has estimated that the fire and maneuver of 3rd company/3L, the ZDO, and 2nd company/2L will dislodge the blue forces and cause them to retreat to the lower right. The interposition force will be there to maneuver through the blue force’s disordered gaps in order to destroy fleeing blue units.
The last supporting attack consists of the paratrooper platoon (KJP) attacking into the blue main force disposition. Remember that this attack is drawn on Illustration 2 instead of Illustration 3. This is likely supporting effort 4.
The KJP attack graphic consists of a small dotted line emanating from a small dotted U-shape. This tells us it is a supporting attack also conducted in open order (疏開隊形). The end tip of the KJP’s attack arrow is located directly on the blue headquarters indicating their objective.
Remember that the front 1/5th of the KJP’s rectangle contains two lines, indicating that this unit’s mission is search and destroy (偵察破擊). This means that the KJP intends to land, search for the blue HQ, and attack it directly in an attempt to conduct a decapitation strike.
These combat actions eventually bring all units near to the doubled thick red vertical dashed line located at the right-most of Illustration 3. Remember that this is the subsequent mission line (後續任務線). At this point the red battalion would consolidate and prepare for the next mission.
Let us now evaluate the Illustration 3 red scheme of maneuver in light of exercise videos and the red tactics article written by LtCol Lu, Taiwan Army.
This plan requires that the commander is able to communicate with operational reserve forces under his command. The battalion commander is in charge of fighting the battalion (coordinating with the other battalions and higher brigade) as well as personally directing the ZDO, anti-tank reserve, and chemical defense troops. All three of these units are not conducting uninterrupted attacks, but must initiate attacks at the right time and place in order to have the most effect (for example the anti-tank unit responding to a blue armored penetration or the flamethrower troops employment).
While the red commander can delegate to the deputies / other command posts, there are still significant span of control issues for red HQ.
The geometries of fire in this plan are absolutely crazy. While this is an example illustration, the main effort (3rd company/ 3L) would likely be maneuvering into the KJP’s position, while the ZDO, 2nd company/ 2L, and interpositional force would be maneuvering into the right flank of 3rd company’s main effort.
Numerous simultaneous and phased supporting efforts can be confusing. These actions are likely time-based, which could also be a huge issue if any unit is delayed. Red assumes negligible comms interruption.
Illustration 3 Glossary
合成營 = Combined Arms Battalion, “HCY”
反化預備隊 = Chemical Defense Reserve
戰鬥預備隊 = Combat Reserve Force, “ZDO”
作戰分界線 = Operational Demarcation Line
攻擊發起線 = Attack Initiation Line
當前任務線 = Current Mission Line
後續任務線 = Subsequent Mission Line
展開 = Unfold
進攻隊形 = Attack Formation
連 = Company
穿插部隊 = Interposition Force
工程破障隊 = Engineer Obstacle Removal Team
鉗擊 = Pincer Attack
縱深攻擊 = Deep Attack
疏開隊形 = Open Order
偵察破擊 = Search and Destroy
Conclusion
As mentioned, this analysis is based on the sources below and Vermilion’s understanding of the PLA. If there are better sources than those listed, please let us know. Share this template across your network of individuals who are China and/or operational experts. Please poke holes in the template and let us know so we can improve it for a Version 2 release.
Template Sources:
Source 1: “Army Combined Arms Battalion Combat” [陸軍合成營戰鬥] by Qiao Zhongwei and Tang Zhongliang, published in Beijing by Military Science Press, August 2014.
Source 2: 邵杰,《戰術學教程》,北京,軍事科學出版社,2013年1月。
Source 3: 呂秉洋、蘇建瑀 。〈由公開來源情報(OSINT)--判斷共軍合成營作戰運用基本模式〉。《陸軍步兵季刊》294 2024.11[民113.11] :2-24。
Source 4: YOUTUBE,〈火藍刀鋒:直擊解放軍合成旅紅藍對抗全過程!多種戰術全方位呈現!「國防故事」|軍迷天下〉, https://youtu.be/w6G9XUaQBWo, https://youtu.be/TD6f7j0zkY8,(檢索日期:112年5月10日)
Source 5: 傅秉忠,《陸軍戰役學教程》,北京,軍事科學出版社,2013年1