
PLA Army 15th Division Night Attack Graphic
PLA Operational Graphics

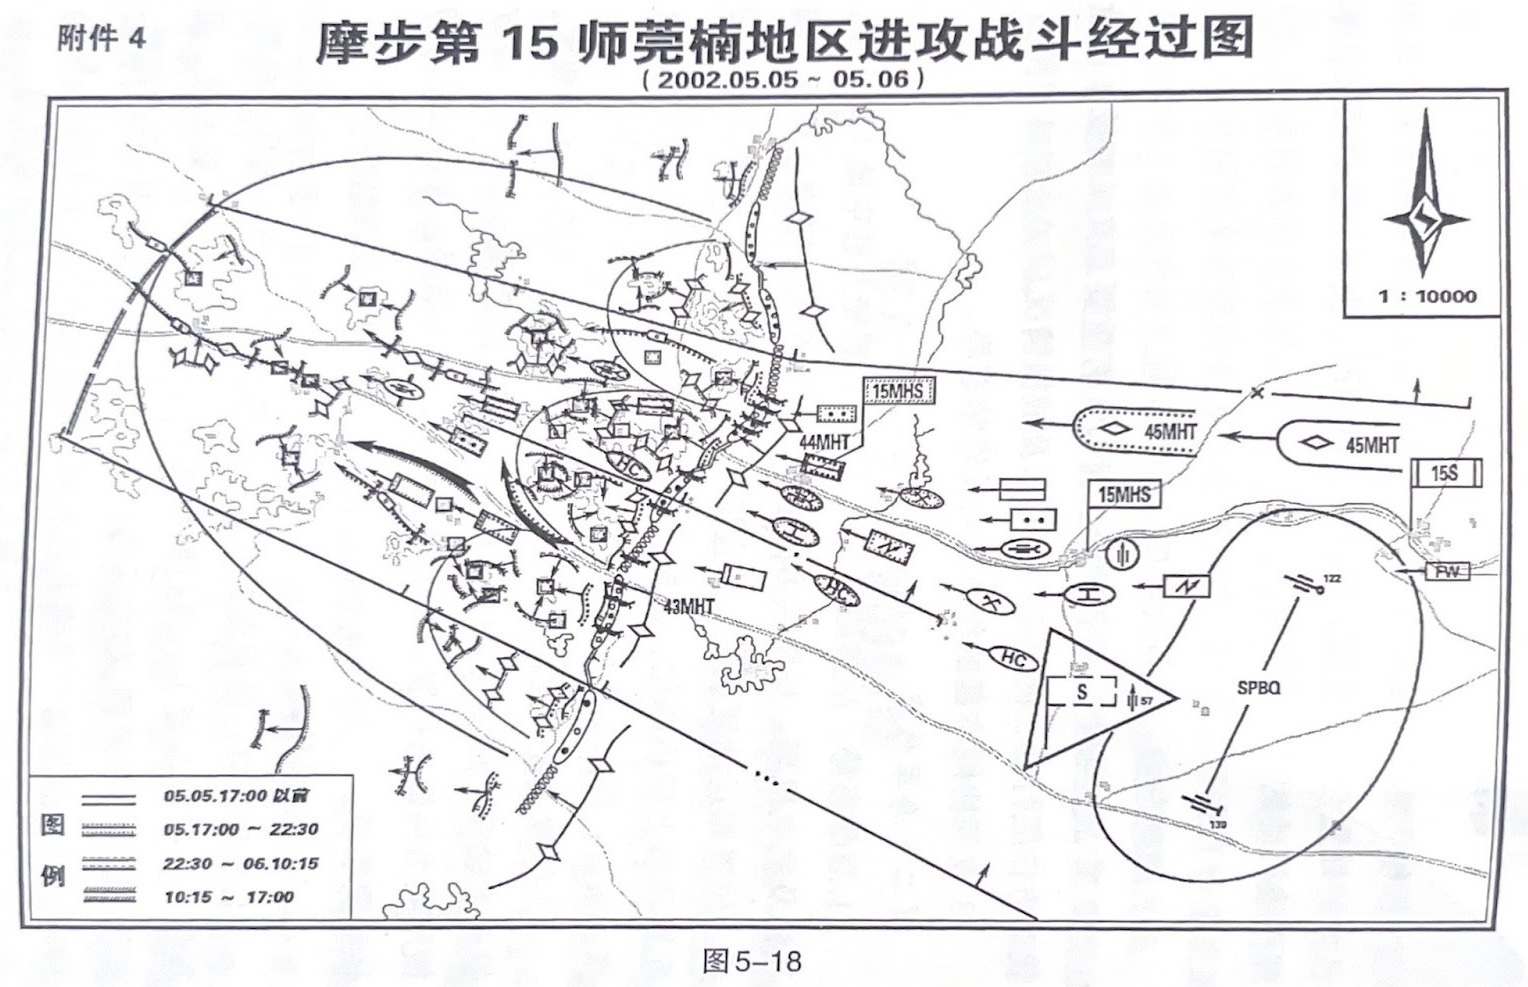
Notes on Sources
Here, we have a 2015-era example of the notional 15th Motorized Infantry Division in the attack. Our erudite readers will understand this is a pre-reform operational graphic. We are sourcing from the 2015 edition of the PLA’s 作战标图 Combat Plotting Doctrine. We have a collection of other PLA publications that corroborate the analysis in this post.
Post-2016 reforms graphics tend to replace regiments with the combined arms brigades (CABs) and divisions with Group Armies.
This article will discuss the division approach, the 44th Regiment attack, and the division's deep battle. For brevity, we will not cover the 43rd regiment.
For lessons learned, skip to the end of the article.
Understanding the Graphic I - Division Rear & Overview

In the rear, we see 15th division (15师 / Shi / S / division) rear headquarters labeled as a flag with double vertical lines labelled “15S.” This rear HQ contains the officers leading the logistics section and the equipment section of the division, with most of their sections (log, supply, medical, repair, maintenance) presumably co-located. This 15S HQ is logically located in a town along a road and forms the root of maneuver for the rest of the division.
Close to 15S is a rear guard detachment of roughly company size, the rectangle marked FW (防卫 / Fang Wei / FW / defense). While this detachment is located in the rear, the short westward-pointing arrow denotes that it is meant to be in the attack moving west.
The large kidney bean shape is the divisional artillery group (师炮兵群 / ShiPaoBingQun / SPBQ / Division Artillery Troop Group) consisting of 122mm howitzers and 130mm cannons.
Overlapping with the SPBQ is another fires position denoted by a triangle containing 57mm towed anti-aircraft artillery. This would normally be labelled FK (反空 / FanKong / FK / air defense), but this label has beeen ommitted.
Within the triangular 57mm AAA position, we spot another command post, marked S for division, with a flag consisting of dotted lines. This is the reserve command post, which contains the division deputy commander and deputy political commissar.
To the north, we see 45MHT (摩托化团 / Mo tua Hua Tuan / MHT / Motorized Regiment) within a U-shaped graphic containing a diamond and with a westward-pointing arrow. This denotes that the 45th motorized regiment, which contains tanks, will conduct an open order attack westward.
In the middle of the graphic, we see a flag denoting the main command post labelled 15MHS (摩托化师 / Mo tua Hua Shi / MHS / Motorized Division). This is the senior leadership of the division with the commander and commissar. We can see the HQ moving from an initial position (1) and advance closer to the line of departure (2).
Understanding the Graphic II - 44MHT Movement to Contact

In the approach, we see a truck company (line through a rectangle), mine clearance (two dots in a rectangle), ATGM team (rocket inside an oval), chemical (crossed retorts inside an oval), engineer (the character 工 for engineers inside an oval), electronic confrontation (lightning with an arrow inside a rectangle), and combined arms reserve (HC for 合成 / hecheng or combined arms/composite inside an oval) in the movement to contact.
The units enclosed by an oval are under the direct command of the closest CP and not delegated to lower units. The units enclosed by a rectangle are company size or below and are likely assigned as general support in a written operations order.
To the north is a separate corps, and to the south is a separate division of the same corps.
Note that the same units are depicted multiple times on the graphic in time sequence order. For example, the ATGM team is depicted north of the road to the right (1), then south of the road in the middle (2), finally unfolds in the attack in the north west part of the graphic (3), and conducts follow-on attacks to the left side of the graphic (4). The time phasing is marked by dots or hatches consistent with the table in the bottom left of the main ops graphic.
Interpreting the Graphic III - 44MHT Breach & Close Combat
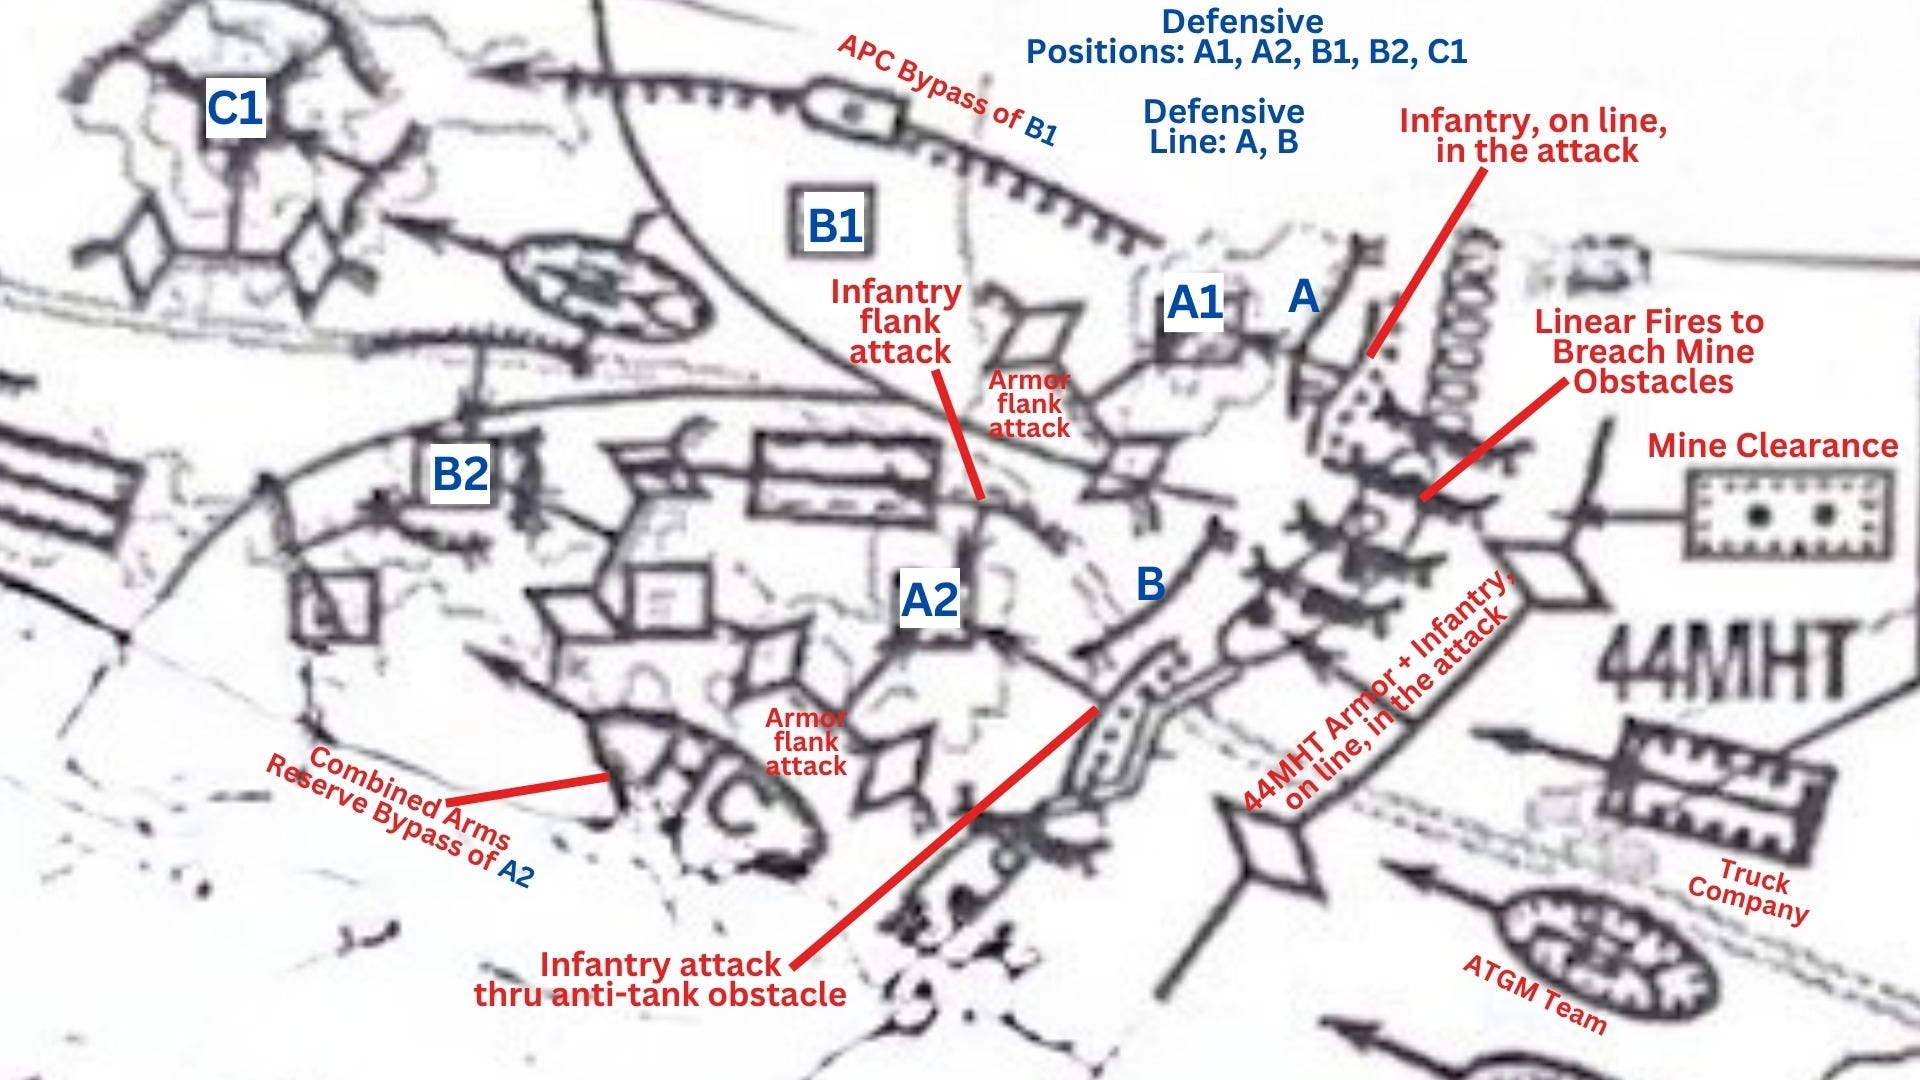
At an undefined time, we see linear fires tasks against the main breach area, a blue minefield. Assisting with this breach by fire is the engineer mine removal team breaching with organic clearance equipment. These maneuvers support the main body of 44MHT attacking on line through the neutralized mine field.
Once passed the minefield, 44MHT dismounts attack through the blue defensive positions at A and B to assault blue defensive positions at A1 and A2. 44MHT armor splits and swings in flank attacks against A1 and A2. Additional infantry attacks A2.
This is a double-axis attack against A1 and a triple-axis attack against A2.
As these attacks are ongoing, we see an element of armored personnel carriers (APCs) in the north bypass B1, while the combined arms reserve in the south bypasses A2. These elements, including whatever forces are intact, are then to strike C1 in the north (5 axes of attack) and B2 in the south (also 5 axes of attack).
Interpreting the Graphic IV - Division Deep Combat
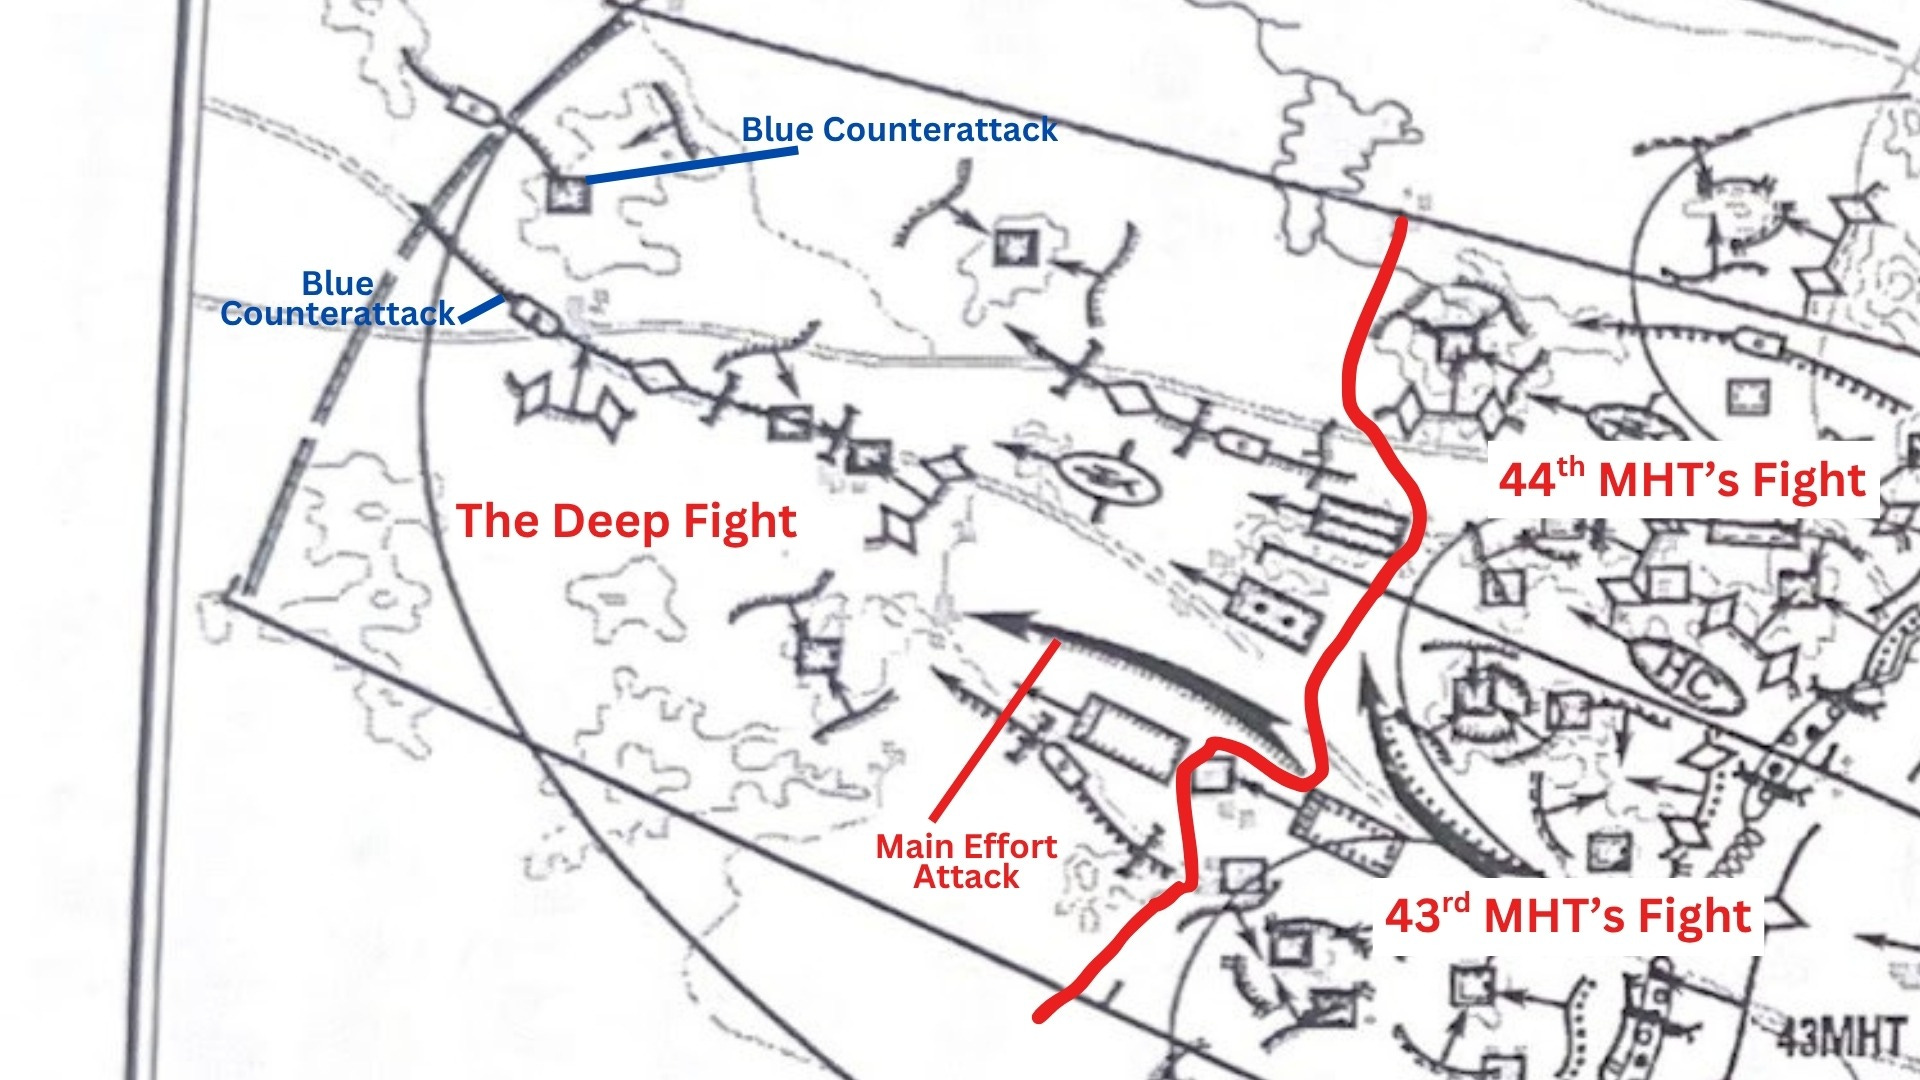
Once the near fight is complete, the 15th Division will re-task org and drive forward in column. The main attack (denoted by larger attack arrows) will be from the 43rd MHT. Blue positions on hilltops to the north and south are to be surrounded. The main blue counterattack is to be countered head-on by armor and an ATGM team, with a flanking attack against the softer blue APCs once most blue armor has committed to the assault.
Lessons Learned
Fires and the Rear CP are the Base of Maneuver
It is clear from this graphic and multiple other examples that PLA ground units doctrinally maneuver off a base. This base consists of the principal fire elements (artillery and air defense) along with the leaders of the logistics and equipment sections.
Finding and suppressing or neutralizing this base of maneuver will be critical to separate the command team from higher echelons, interrupt communications, depress handling of casualties, and strike at the PLA’s fires capabilities.
Locating the base and analyzing the terrain and blue force disposition will be the key to determining the attack axis.
The Command Team Controls Key Units
The command team (commander and commissar) will play a key battlefield role themselves by personally commanding important elements.
In this example these elements include the anti-tank weaponry, the combined arms reserve, chemical weapons (flamethrowers), and combat engineers. Locating these types of elements should help to locate the command team, which is a high priority C2 target.
Battlefield Geometry is Crazy
There are multiple instances in this graphic of units attacking from multiple directions simultaneously in order to overwhelm Blue. Deconflicting fires from these units will be difficult to impossible. The PLA seeks to create mass and chaos to overwhelm. If this is not orchestrated correctly or is thrown against a decoy or highly maneuverable unit, the PLA will have difficulty avoiding friendly fire, casualties, and internal disruption.
Casualty Acceptance is High
In accordance with the battlefield geometry, the PLA places its units into positions of high risk. In this particular example, infantry is often used to fix blue units with frontal attacks into defensive positions and high ground.
Expect the PLA to not be bashful about accepting high risk in applying elements to fix and cause casualties on both sides.
Task Org is Important
There are multiple natural break points in this attack graphic. During these pauses, expect political officers to reorganize and re-task the surviving units. Counterattacking the PLA during these intervals will be key to catching red units exhausted and internally focused, offering opportunities to push red off plan.
Forces and Positions Matter at Least as Much as Terrain
Red expects blue to anchor on key terrain in the defense and focus on key terrain in the attack. The PLA builds in these assumptions to predict where blue will defend and counterattack.
Using an unexpected tactical disposition or a shifting disposition will throw the PLA off balance, as they expect to fight a highly doctrinal blue force.
We see this especially in the deep fight, as red does not anchor a defensive line on terrain, nor do they attack utilizing favorable terrain. In fact, the PLA does the opposite and attacks into terrain favorable to the blue defender due to the assessment that blue will naturally anchor onto key terrain. PLA leadership would rather keep the tempo of the attack high to gain exploitation rather than work with the terrain.
Time Phasing is Important
The elements of this plan are anchored by time primarily and conditions less so. This has advantages in a comms denied environment, but gives less flexibility to the plan. Something as simple as giving ground and refusing to fight the PLA’s plan has the potential to disorient red leadership.